Elastic Kubernetes Service (Amazon EKS)

Introduction
What is Kubernates?
Kubernates (K8s) is an open-source system for automating the deployment, scaling and management of containerized applications.
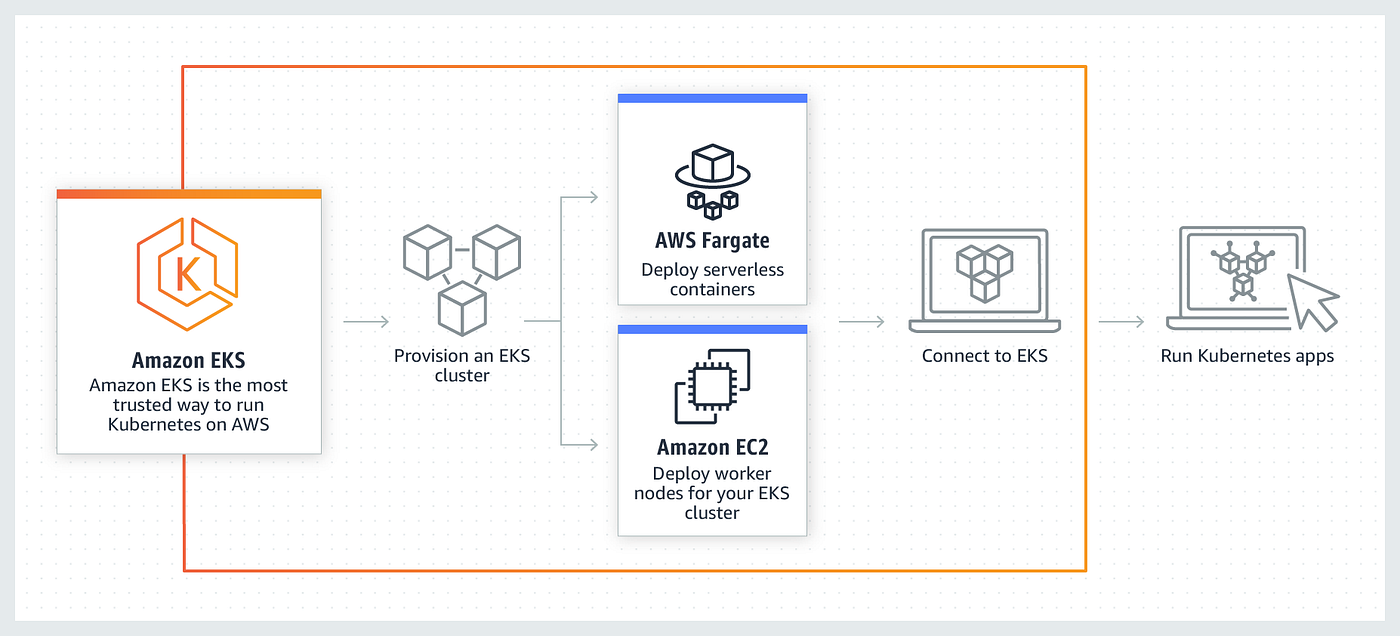
What is Amazon EKS?
Amazon EKS is a fully managed service that makes it easy for you to use Kubernetes on AWS without having to be an expert in managing Kubernetes clusters. A Kubernetes cluster is a set of node machines for running containerized applications.There are some tool which make K8s cluster :-
- Kubectl is a command line tool for controlling K8s clusters. User connect with the Kubectl. For download the use this link and set the path. https://storage.googleapis.com/kubernetes-release/release/v1.18.0/bin/windows/amd64/kubectl.exe
- API_Server validates and configures data for the API objects. It provides the frontend to the cluster’s shared state through which all other components interact.
- Schedular refers to making sure that pods are matched to nodes so that Kubelet can run them.
- Controller is a control loop that watches the shared state of the cluster.
- Kubelet is responsible for the maintaining the pods.
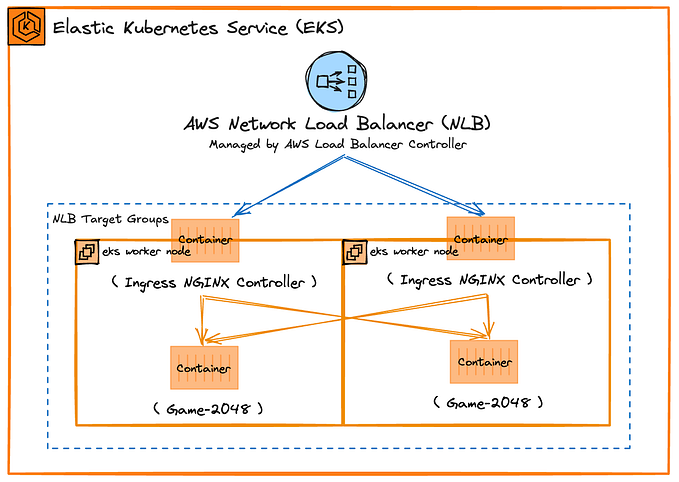
How it works?
What is eksctl?
eksctl is a simple cli tool for creating clusters on EKS. For setup this use this link https://awscli.amazonaws.com/AWSCLIV2.msi
Let’s do some practical
Step 1: Login process
It is always good practice to login the account with the IAM user with limited power because of security purpose. For this make the IAM user.

If you want to login into the aws console from the webUI then simply login into the account.
If you want to login with CLI then use the below command and simply give the access key, secret key and region name.

Step 2: Create EKS cluster
I am going to create cluster having 2 node groups and first node group have the 2 nodes and second have the 1 node with the help of yaml code. Code is

And run it with

After this you have 3 nodes are running.

After this you need to update our kubeconfig file so that kubectl command can work and we can connect to cluster from outside world.

It is always a good practice to create a different namespace for every project, So I am creating a namespace for this.

After this I am updating this namespace as my default namespace.

Step 3: Creation of PVC
First create a File System so that you can use EFS as storage.

For using amazon EFS as storage we have to just install amazon-efs-utils on all worker nodes.

Now, create a provisioner for EFS.

Step 4: Create a Role binding.
After creation of provisioner , create a role binding.

This will create a role binding . But we also needs PVCs so that data insides the pods can remain persistent so we have to create PVCs and as we will be using EFS so for this we need a storage class that support the EFS.

Step 5: Deploying 2 systems in 2 different nodes.
First, I am creating mysql_deployment.


Second, I am creating wordpress_deployment.


Step 6: I am creating kustomization file to complete the connection between the nodes.

Apply the kustomization.

Result:
Now for accessing your wordpres website go to ELB.

Through this you got page like this