Integrating NAT gateway with the VPC by Terraform

To know about the VPC, Subnet, Internet gateway, Routing Table, then visit the previous article link is given below
https://medium.com/@kunaljai844506/aws-vpc-by-terraform-32b361949575?source=friends_link&sk=47534f4eb1dedec8b917703371225187Introduction
What is NAT Gateway?
It is a highly available AWS managed service that makes it easy to connect to the Internet from instances within a private subnet in an Amazon Virtual Private Cloud (Amazon VPC). Previously, you needed to launch a NAT instance to enable NAT for instances in a private subnet.

What is Elastic IP?
An Elastic IP address is a static IPv4 address designed f computing..With an Elastic IP software by rapidly remapping the address to another instance in your account. An Elastic IP address is a public IPv4 address, which is reachable from the internet.

Task which we are going to perform
1)Write an Infrastructure as code using terraform, which automatically create a VPC.
2)In that VPC we have to create 2 subnets:
a) public subnet [ Accessible for Public World! ]
b) private subnet [ Restricted for Public World! ]
3)Create a public facing internet gateway for connect our VPC/Network to the internet world and attach this gateway to our VPC.
4)Create a routing table for Internet gateway so that instance can connect to outside world, update and associate it with public subnet.
5)Create a NAT gateway for connect our VPC/Network to the internet world and attach this gateway to our VPC in the public network.
6)Update the routing table of the private subnet, so that to access the internet it uses the nat gateway created in the private subnet.
7)Launch an ec2 instance which has Wordpress setup already having the security group allowing port 80 sothat our client can connect to our wordpress site. Also attach the key to instance for further login into it.
8)Launch an ec2 instance which has MYSQL setup already with security group allowing port 3306 in private subnet so that our wordpress vm can connect with the same. Also attach the key with the same.
Let’s do some practical.
Prerequisite for this task are:
We are going to perform all the task with the help of terraform code, and I make this terraform code in a directory because after write the code we apply the terraform on the directory.
So, we create a directory and in this directory I am going to create a task4.tf file.

Before writing any code we have to give the provider-name (AWS) from where the terraform code will contact.
provider "aws" {
     region = "ap-south-1"
     profile = "kunal1"
}
Creating key-pair
resource "aws_key_pair" "task4_key" {
  key_name   = "task_key"
  public_key = "ssh-rsa AAAAB3NzaC1yc2EAAAABJQAAAQEA5r5/mcM......"
}
Step 1: Creating the terraform code for the VPC.
resource "aws_vpc" "vpc" {
  cidr_block       = "192.168.0.0/16"
  instance_tenancy = "default"tags = {
    Name = "task4_vpc"
  }
}
Step 2: Creating 2 subnets for 2 different VM
a.) Public Subnet [ Accessible for Public World ]
resource "aws_subnet" "public" {
  vpc_id     = aws_vpc.vpc.id
  cidr_block = "192.168.10.0/24"
  availability_zone = "ap-south-1b"
  map_public_ip_on_launch = "true"tags = {
    Name = "public_subnet"
  }
}
b.) Private Subnet [ Restricted for Public World ]
resource "aws_subnet" "private" {
  vpc_id     = aws_vpc.vpc.id
  cidr_block = "192.168.20.0/24"
  availability_zone = "ap-south-1a"tags = {
    Name = "private_subnet"
  }
}
Step 3: Creating a Internet gateway and attach this gateway with the VPC.
resource "aws_internet_gateway" "gateway" {
       vpc_id = aws_vpc.vpc.idtags = {
    Name = "vpc_gateway"
  }
}
Step 4: Creating a routing table for Internet gateway so that instance can connect to outside world, update and associate it with public subnet.
resource "aws_route_table" "route" {
      vpc_id = aws_vpc.vpc.id
           route {
              cidr_block = "0.0.0.0/0"
              gateway_id = aws_internet_gateway.gateway.id
          }tags = {
     Name = "gatewayroute"
       }
 }
resource "aws_route_table_association" "public" {
   subnet_id   = aws_subnet.public.id
   route_table_id = aws_route_table.route.id
}
Step 5:
Creating the Elastic IP.
resource "aws_eip" "eip" {
  vpc = true
}
Creating NAT gateway and connect it to the public subnet.
resource "aws_nat_gateway" "gw2" {
  allocation_id = "${aws_eip.eip.id}"
  subnet_id     = "${aws_subnet.public.id}"


  tags = {
    Name = "NATGW"
  }
}
Step 6: Update the routing table of the private subnet, so that to access the internet it uses the nat gateway created in the private subnet.
resource "aws_route_table" "route_nat" {
  vpc_id = "${aws_vpc.vpc.id}"


  route {
    cidr_block = "0.0.0.0/0"
    nat_gateway_id  = "${aws_nat_gateway.gw2.id}"
  }


  tags = {
    Name = "NAT-gateway"
     }
 }


resource "aws_route_table_association" "private" {
  subnet_id      = aws_subnet.private.id
  route_table_id = aws_route_table.route.id
}
Step 7:
a.) Creating security group for the VM wordpress.
resource "aws_security_group" "wordpress-sg" {
  name        = "wordpress-sg"
  description = "Allow ssh and httpd inbound traffic"
  vpc_id      = "${aws_vpc.vpc.id}"ingress {
    description = "SSH"
    from_port   = 22
    to_port     = 22
    protocol    = "tcp"
    cidr_blocks = [ "0.0.0.0/0" ]
  }ingress {
    description = "HTTP"
    from_port   = 80
    to_port     = 80
    protocol    = "tcp"
    cidr_blocks = [ "0.0.0.0/0" ]
  }egress {
    from_port   = 0
    to_port     = 0
    protocol    = "-1"
    cidr_blocks = ["0.0.0.0/0"]
  }tags = {
    Name = "wordpress-sg"
  }
}
b.) Launch an EC2 instance for the VM Wordpress.
resource "aws_instance" "wordpress" {
   ami = "ami-004a955bfb611bf13"
   instance_type = "t2.micro"
   associate_public_ip_address = true
   subnet_id = aws_subnet.public.id
   vpc_security_group_ids = [ aws_security_group.wordpress-sg.id]
   key_name = "task_key"tags = {
         Name = "Wordpress"
     }
}
Step 8:
a.) Creating security group for the MYSQL.
resource "aws_security_group" "mysql-sg" {
  name        = "mysql-sg"
  description = "Allow only ssh inbound traffic"
  vpc_id      = "${aws_vpc.vpc.id}"ingress {
    description = "SSH"
    from_port   = 3306
    to_port     = 3306
    protocol    = "tcp"
    cidr_blocks = [ "0.0.0.0/0" ]
  }egress {
    from_port   = 0
    to_port     = 0
    protocol    = "-1"
    cidr_blocks = ["0.0.0.0/0"]
  }tags = {
    Name = "mysql-sg"
  }
}
b.) Launch an EC2 instance for the VM MYSQL.
resource "aws_instance" "mysql" {
   ami = "ami-08706cb5f68222d09"
   instance_type = "t2.micro"
   subnet_id = aws_subnet.private.id
   vpc_security_group_ids = [ aws_security_group.mysql-sg.id ]
   key_name = "task_key"tags = {
         Name = "mysql"
     }
}
So, finally our code is ready. For apply this code(task4.tf) first we have to plugin terraform by using the below command in the CLI.
terraform init
Now, run the command with the below command.
terraform apply --auto-approve
If there is no error in your code then it will successfully launch everything.
RESULTS:


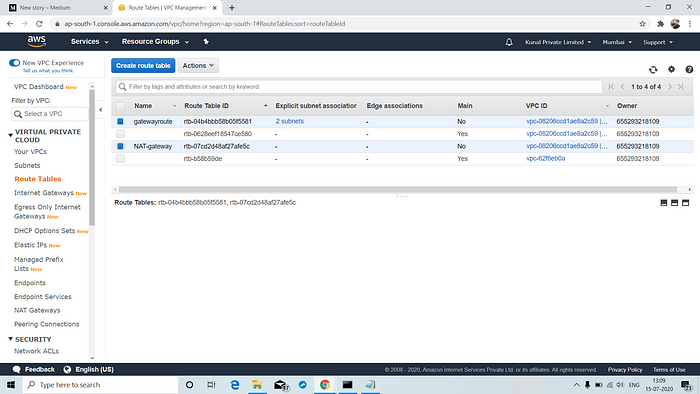


Now, by using the public IP of wordpress instance we can connect to the wordpress website.

Now, we are going to destroy complete setup by using the below command.
terraform destroy --auto-approve