Launching Web-Server using AWS with Terrafrom

Quick Introduction
What is AWS?
Amazon Web Services (AWS) is a subsidiary of Amazon that provides on-demand cloud computing platforms and APIs to individuals, companies and governments, on a metered pay-as-you-go basis. More than 212 services are provided by the AWS in different fields like IOT, computing, storage, networking, database, analytics, application services, deployment, management, mobile and developer tools.
Services provided by the AWS
1.) EC2 (Elastic Compute Cloud): EC2 is the services by the AWS that provides secure, resizable compute capacity in the cloud. It provides compute as a service to the users(CAAS).

2.) EFS (Elastic File System): EFS provides a simple, scalable, fully managed elastic NFS (Network File System) file system for use with AWS Cloud services and on-premises resources.

3.) S3 (Simple Storage Service): S3 is an object storage service that offers industry-leading scalability, data availability, security, and performance. Amazon S3 is designed for 99.999999999% (11 9’s) of durability and stores data for millions of applications for companies all around the world.

4.) CloudFront: Amazon CloudFront is a fast content delivery network (CDN) service that securely delivers data, videos, applications, and APIs to customers globally with low latency, high transfer speeds, all within a developer-friendly environment.

What is Terraform?
Terraform is an open-source infrastructure as a code software tool created by HashiCorp. It enables users to define and provision a datacenter infrastructure using a high-level configuration language known as Hashicorp Configuration Language (HCL).The infrastructure Terraform can manage includes low-level components such as compute instances, storage, and networking, as well as high-level components such as DNS entries, SaaS features, etc.

Task which we are going to perform
1. Create Key-pair and Security group which allow the port 80 for http and port 22 for ssh.
2. Launch EC2 instance. In this EC2 instance use the existing key or provided key and security group which we have created in step 1.
3. Launch one Volume using the EFS service and attach it in your VPC, then mount that volume into /var/www/html
4. Developer have uploded the code into github repo.
5. Copy the github repo code into /var/www/html
6. Create S3 bucket, and deploy the images into the s3 bucket and change the permission to public readable.
7. Create a Cloudfront using s3 bucket(which contains images) and use the Cloudfront URL to update in code in /var/www/html
Let’s do some practical.
Prerequisite for this task are:
1.) Make sure you already download the AWS CLI if not then download for windows. For mac and linux please visit the aws site.
https://awscli.amazonaws.com/AWSCLIV2.msi2.) Make sure you already download the terraform if not the download for windows and set the path through here.
https://releases.hashicorp.com/terraform/0.12.28/terraform_0.12.28_windows_amd64.zip3.) Give credentials of the profile:

4.) We are going to perform all the task with the help of terraform code, and I make this terraform code in a directory because after write the code we apply the terraform on the directory.
So, we create a directory and in this directory I am going to create a task2.tf file.

5.) Before writing any code we have to give the provider-name (AWS) from where the terraform code will contact.
provider "aws" {
     region = "ap-south-1"
     profile = "kunal1"
}
Step by Step solution for our task
Step 1: Create Key-pair and Security group which allow the port 80 for http amd port 22 for ssh.
Creating key-pair
resource "tls_private_key" "private_key" {
 algorithm = "RSA"
 rsa_bits = 4096
   }

resource "aws_key_pair" "pub_key" {
 key_name = "task_key"
 public_key = tls_private_key.private_key.public_key_openssh
}resource "local_file" "private_key" {
    depends_on = [tls_private_key.private_key]
    content = tls_private_key.private_key.private_key_pem
    filename = "task_key.pem"
    file_permission = 0400
}
Creating security-group
resource "aws_security_group" "sg" {
  name        = "security group"
  description = "Give Security permissions"

  ingress {
    description = "For SSH"
    from_port   = 22
    to_port     = 22
    protocol    = "tcp"
    cidr_blocks = ["0.0.0.0/0"]
  }

     ingress {
    description = "For HTTP"
    from_port   = 80
    to_port     = 80
    protocol    = "tcp"
    cidr_blocks = ["0.0.0.0/0"]
  }egress {
    from_port   = 0
    to_port     = 0
    protocol    = "-1"
    cidr_blocks = ["0.0.0.0/0"]
  }tags = {
    Name = "security group"
  }
}
Step 2: Launch EC2 instance. In this EC2 instance use the existing key or provided key and security group which we have created in step 1.
resource "aws_instance"  "instance" {
  ami   = "ami-0732b62d310b80e97"
  instance_type = "t2.micro"
  key_name   = aws_key_pair.pub_key.key_name
  security_groups = ["security group"]

tags = {
        Name = "My_instance"
   }
}
Step 3: Launch one Volume using the EFS service and attach it in your VPC, then mount that volume into /var/www/html
resource "aws_efs_file_system" "efs" {
  creation_token = "my-product"tags = {
    Name = "MyProduct"
  }
}resource "aws_efs_mount_target" "efs_mount" {
  file_system_id = aws_efs_file_system.efs.id
  subnet_id      = aws_instance.instance.subnet_id
}resource "null_resource" "mounting" {
depends_on = [ aws_efs_mount_target.efs_mount, ]connection  {
     type = "ssh"
     user = "ec2-user"
     private_key = tls_private_key.private_key.private_key_pem
     host = aws_instance.instance.public_ip
    }provisioner "remote-exec" {
    inline = [
        "sudo yum install httpd php git -y",
         "sudo systemctl restart httpd",
         "sudo systemctl enable httpd",
         "sudo mkfs.ext4  /dev/xvdh",
         " sudo mount /dev/xvdh  /var/www/html",
         " sudo rm -rf /var/www/html/*",
         "sudo git clone https://github.com/KunalKumarJaiswal/myfirstproject.git  /var/www/html",
         "sudo yum install nfs-utils -y"
          ]
       }
   }
Step 4: Developer have uploded the code into github repo.

Step 5:Copy the github repo code into /var/www/html
Already done in the step 3.
Step 6: Create S3 bucket, and deploy the images into the s3 bucket and change the permission to public readable.
resource "aws_s3_bucket" "task2-kunal-bucket" {
  bucket = "task2-kunal-bucket"
  acl = "public-read"
  force_destroy = true

  versioning {
    enabled = true
  }tags = {
    Name = "task2-kunal-bucket"
  }
}resource "aws_s3_bucket_object" "task2_object" {
  bucket = aws_s3_bucket.task2-kunal-bucket.id
  key    = "image.jpg"
  source = "C:/Users/KUNAL JAISWAL/Pictures/aws/Amazon-S3.jpg"
  acl = "public-read"

  force_destroy = true
}

 locals{
             s3_origin_id = "S3-${aws_s3_bucket.task2-kunal-bucket.bucket}"
}
Step 7:Create a Cloudfront using s3 bucket(which contains images) and use the Cloudfront URL to update in code in /var/www/html
resource "aws_cloudfront_distribution" "task2_cf" {
   depends_on=[aws_s3_bucket.task2-kunal-bucket]
   origin {
        domain_name = aws_s3_bucket.task2-kunal-bucket.bucket_regional_domain_name
        origin_id = aws_s3_bucket.task2-kunal-bucket.idcustom_origin_config {
            http_port = 80
            https_port = 80
            origin_protocol_policy = "match-viewer"
            origin_ssl_protocols = ["TLSv1", "TLSv1.1", "TLSv1.2"]
        }
    }

    enabled = true
     is_ipv6_enabled = truedefault_cache_behavior {
        allowed_methods = ["DELETE", "GET", "HEAD", "OPTIONS", "PATCH", "POST", "PUT"]
        cached_methods = ["GET", "HEAD"]
        target_origin_id = aws_s3_bucket.task2-kunal-bucket.id
         forwarded_values {
            query_string = false

            cookies {
               forward = "none"
            }
        }viewer_protocol_policy = "allow-all"
        min_ttl = 0
        default_ttl = 3600
        max_ttl = 86400
    }
# Restricts who is able to access this content

       restrictions {
          geo_restriction {
              restriction_type = "none"
        }
    }
viewer_certificate {
        cloudfront_default_certificate = true
    }

      connection {
             type = "ssh"
             user = "ec2-user"
             private_key = tls_private_key.private_key.private_key_pem
             host = aws_instance.instance.public_ip
     }

   provisioner "remote-exec" {

    inline = [

     "sudo su << EOF",
              "echo \"<img src='http://${self.domain_name}/${aws_s3_bucket_object.task2_object.key}'>\" >> /var/www/html/index.php",
              "EOF",
    ]
   }
}
So, finally our code is ready. For apply this code(task3.tf) first we have to plugin terraform by using the below command in the CLI.
terraform init
Now, run the command with the below command.
terraform apply --auto-approve
If there is no error in your code then it will successfully launch everything.
Results:


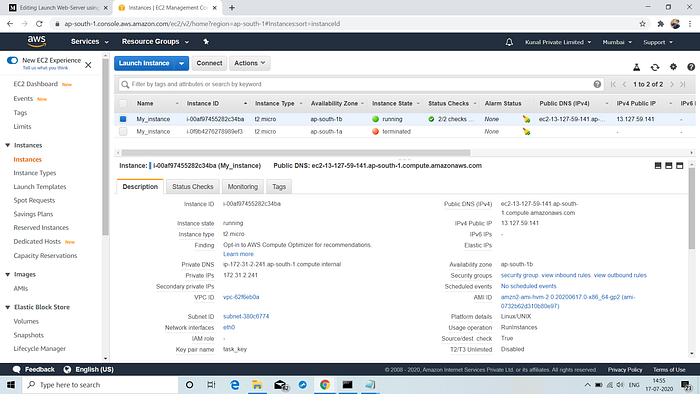


Now, by using the public IP of instance we can connect to the webpage.

So, finally this webpage is created by terraform just by running a single command.So, now if we want to destroy complete setup, then by using this command terraform destroy It will destroy everything automatically.
Now, we are going to destroy complete setup by using the below command.
terraform destroy --auto-approve